We know your team works hard, so give them the recognition they deserve using our Team Widget. This widget allows you display all of your team members' photos and contact information.

Robert Smith
Chief Executive Officer of Widgets(XXX) XXX-XXXX
(XXX) XXX-XXXX
rsmith@widget.utah.edu
1234 Widget Way
Robert Smith
Chief Executive Officer of Widgets(XXX) XXX-XXXX
rsmith@widget.utah.edu
1234 Widget Way

Robert Smith
Chief Executive Officer of Widgets(XXX) XXX-XXXX
(XXX) XXX-XXXX
rsmith@widget.utah.edu
1234 Widget Way
Robert Smith
Chief Executive Officer of Widgets(XXX) XXX-XXXX
rsmith@widget.utah.edu
1234 Widget Way

Robert Smith
Chief Executive Officer of Widgets(XXX) XXX-XXXX
(XXX) XXX-XXXX
rsmith@widget.utah.edu
1234 Widget Way
Robert Smith
Chief Executive Officer of Widgets(XXX) XXX-XXXX
rsmith@widget.utah.edu
1234 Widget Way

Robert Smith
Chief Executive Officer of Widgets(XXX) XXX-XXXX
(XXX) XXX-XXXX
rsmith@widget.utah.edu
1234 Widget Way
Robert Smith
Chief Executive Officer of Widgets(XXX) XXX-XXXX
rsmith@widget.utah.edu
1234 Widget Way
Here's how to get started:
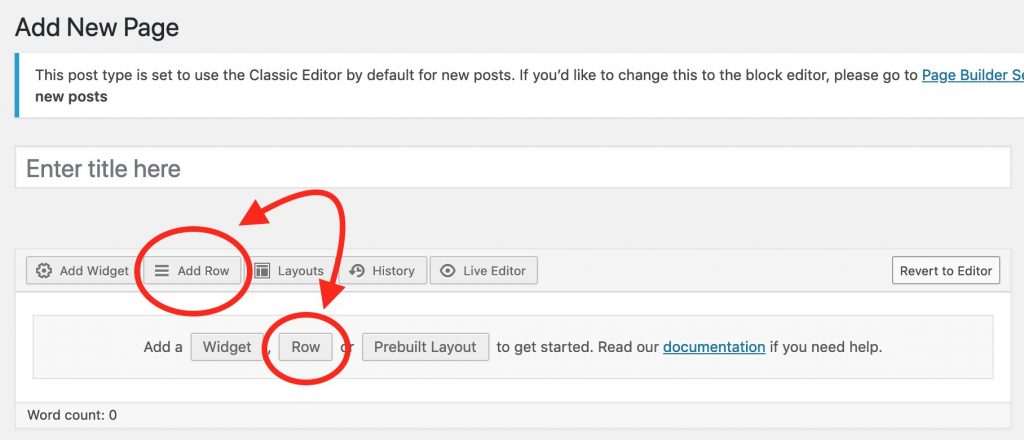
First you will need to add a row before you drop in your widget. To add a row: click on the "Add Row" option above the editor, or click on "Row" from the editor "Add a section." You can also right click and open the WordPress Menu and add a row from there.


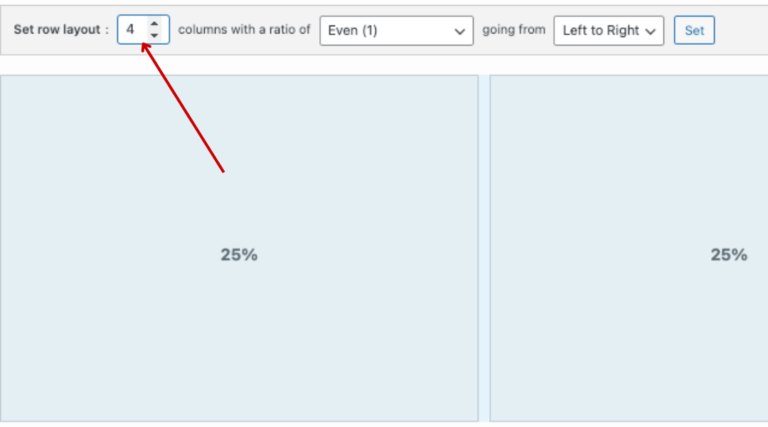
Note: if you want to display multiple team members in the same row, you will need to adjust the format of the row where your team widget is placed by clicking the wrench icon to the right of the row and select "edit row."

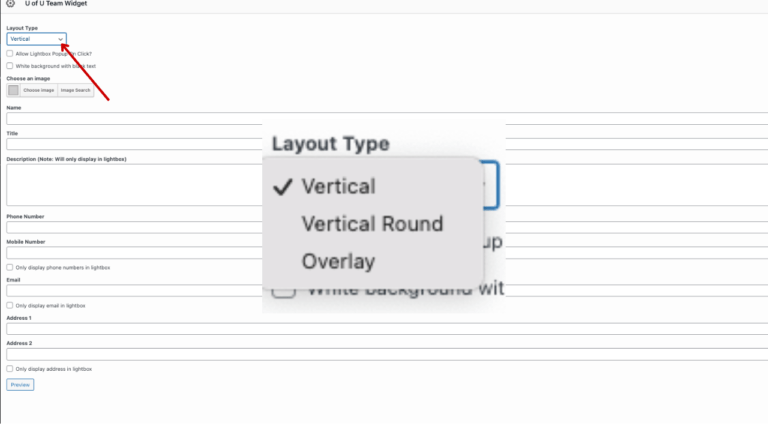
Once you have selected the "Team Widget" from the widget menu and have dropped it into a row, add as many team members as necessary. You can also choose the format of which you want your team members to be displayed in the top left corner of the widget menu.

Now it's time to start dropping in your content, including your team member's photo and any information you would like to include about them. It's important to make sure all uploaded team member's photos are the same size to remain consistent. We recommend using a photo size of 800 x 800 or 1200 x 1200. Please make sure your team member's head is aligned to center of the frame of the photo to ensure no part of the image is cut off.

That's it! If you would like to preview your widget before publishing it to your page, be sure to hit "Preview" in the top right corner of your WordPress page. To make your updates live hit the "Publish" button near the top right corner of your WordPress window.
