sections in this tutorial:
Build a Form Configure Form Settings Send Email Notifications
Formidable. The WordPress Form builder plugin that turns dreams into reality. Build complex forms the easy way with a simple drag and drop form builder.
The WordPress drag and drop form builder included in Formidable Forms allows for quick and easy re-arranging of form fields, or even entire sections. Easily test different layouts to help maximize your conversion rates. Move fields to give your form a more natural flow, or add page breaks and re-arrange fields to turn your long form into a multi-page form. Simply click and hold the Move icon in the top right of your field or section and move the field to its new position.
The whole form building process is designed with speed and simplicity in mind. Follow these simple steps to create a WordPress form.

BUILD A FORM:
Go to 'Formidable' on the left menu of the WordPress dashboard → select 'Forms' from the menu and click 'Add New' at the top of the page. Start with a blank form or import a previously built form.

Click ‘Add New’ to start creating your own form from the form builder.
Add fields to your form. You can either use the drag and drop form maker or click on the field name to add fields at the end of the form. Learn more about the different field types.

Click 'Create'. This saves your form and takes you to the Form Settings page.
You have just created a form! To preview it, just click the 'Preview' button. Or publish your form and see how it looks on your site.

On Submit
Choose what the user sees after an entry is submitted. Select one of the following: 'Show Message', 'Redirect to URL', or 'Show Page Content'.
Show Message
After an entry is submitted, a success message will appear. This message can be modified in the 'Messages' section of your form's Settings. You can add any values from the submitted entry to your confirmation message, including conditional statements. You can also choose to include the blank form below your confirmation message. This is helpful if users will be submitting the form multiple times in a row.
If you would like to change the default 'On Submit' message, go into your Formidable 'Global Settings' and scroll down to 'Default Messages' → 'Success Message' box.

SEND EMAIL NOTIFICATIONS
Send automatic, customized email notifications and autoresponders whenever an entry is submitted, updated, or deleted. Add or edit notifications by going into your form → 'Settings' → 'Form Actions'.
Go into your form. Click on 'Settings' → 'Form Actions'. By default there will already be an email notification set up. Click on the Email Notification to edit it: or click the Email Notification icon to add an additional notification.

Give your email notification a Label for easy reference. This label will only be seen on the back-end.
Enter one or more email addresses in the To box.
The only formats that can be used are 'name <email@example.com>' and 'email@example.com'. To send the same notification to multiple recipients, separate them with a comma.By default, the [admin_email] shortcode will be inserted in the To box. This will send the notification to the email address from your WordPress General Settings page.
If you would like others to receive a copy of the message, click CC and insert the email(s) in the CC box that appears. If you would like others to receive a copy of the message but do not want them to be shown to the recipients, click BCC and insert the email(s) in the BCC box that appears.
The only formats that can be used are 'name <email@example.com>' and 'email@example.com'. Separate multiple email addresses with a comma.
Insert the sender's name and email address in the From box. By default, your website name and admin email address from your WordPress General Settings page will be used.

Add a subject in the Subject box.
By default, the [default-message] shortcode will be inserted in the Message box.
This will display all completed fields in the email notification, which will look like this:

Protecting your form against spam
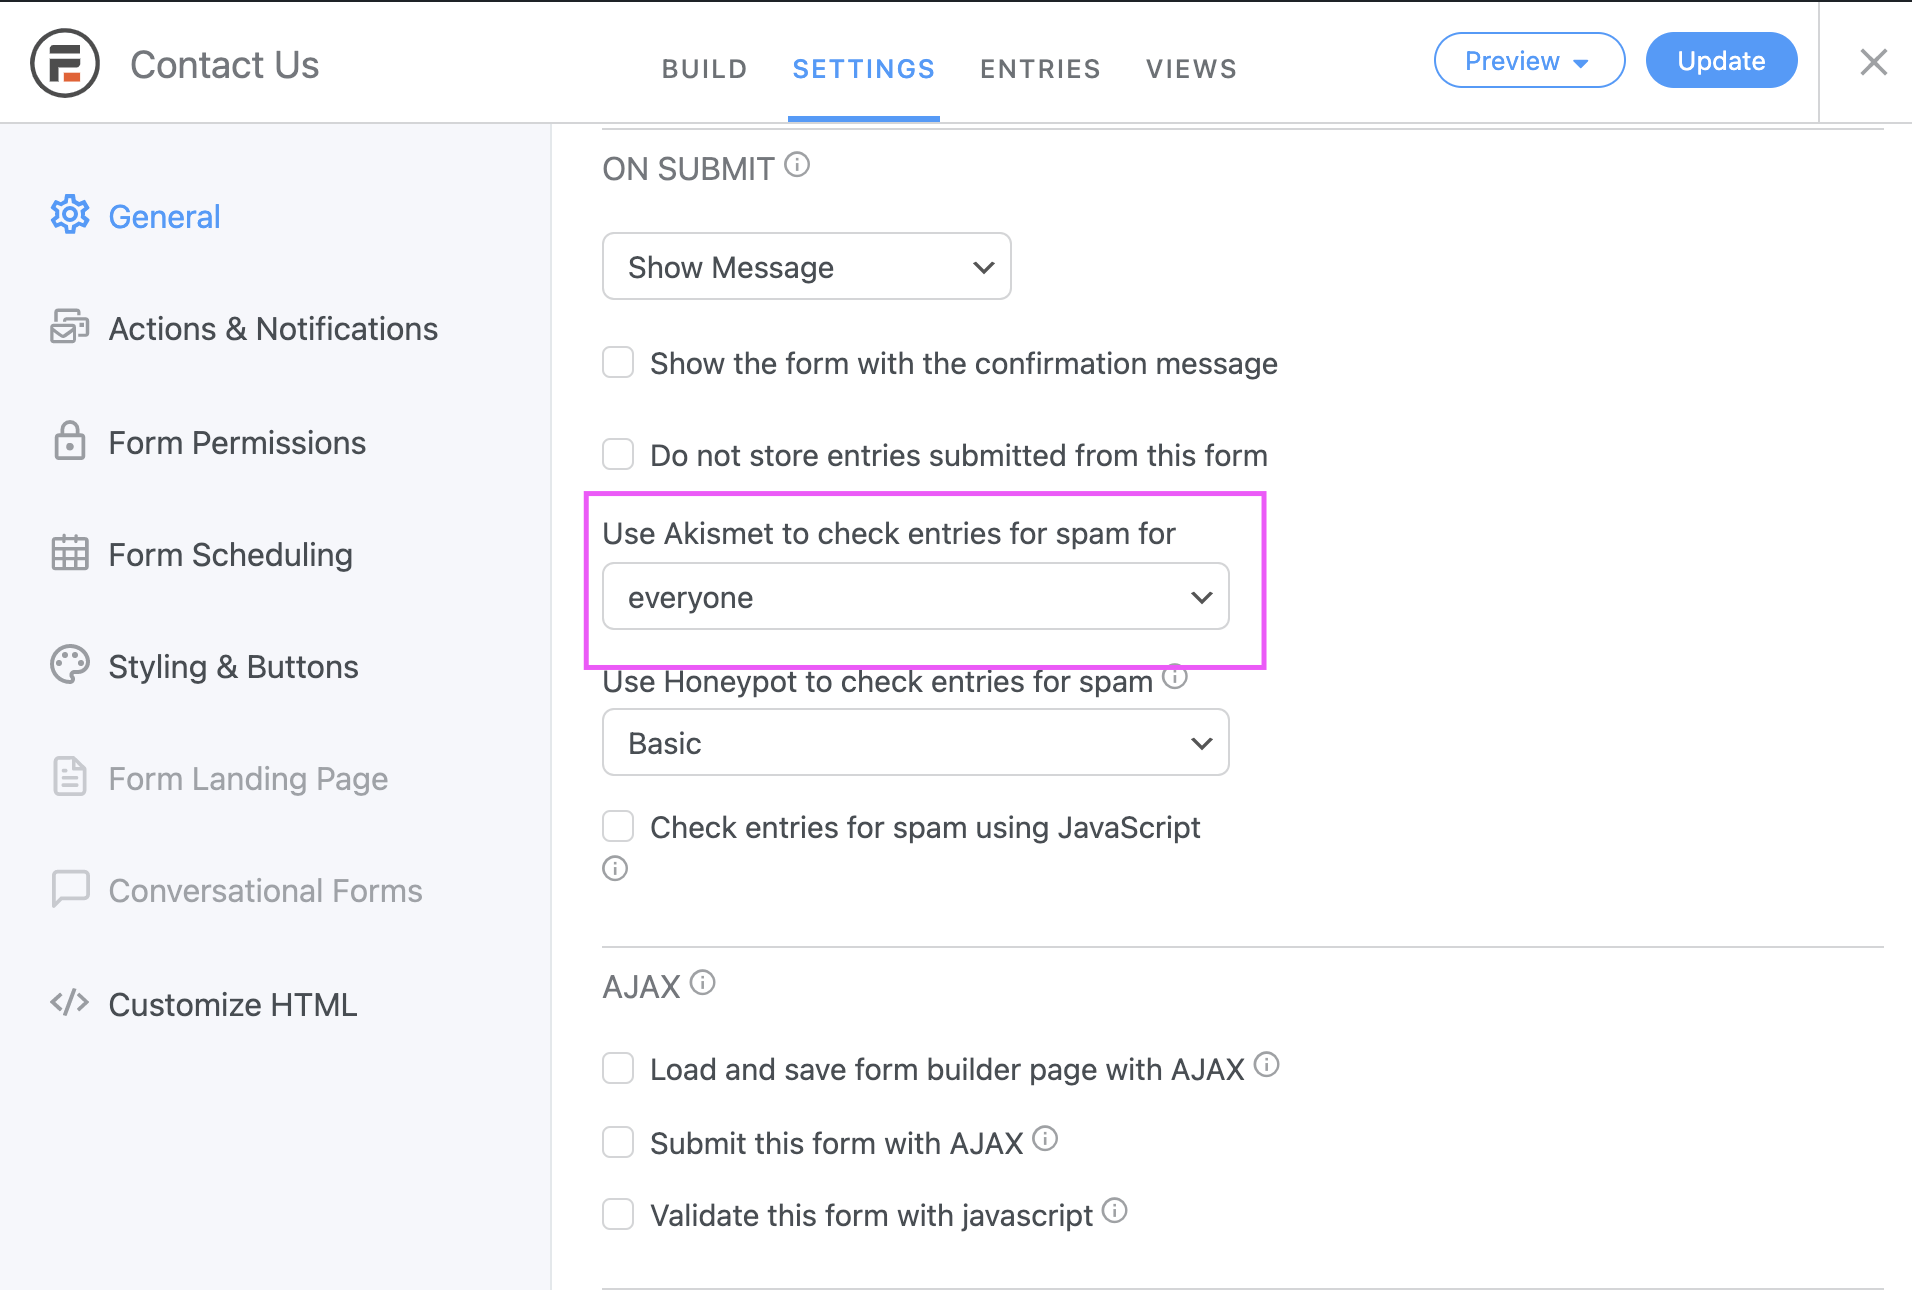
It only takes a few clicks in your form settings to protect your form against spam submissions. If your site is hosted with UMC then you should already have Akismet--a spam-blocker tool--installed on your site. In your form settings there is an option titled, "Use Akismet to check your form entries for spam." Go ahead and select the 'Everyone' option so that Akismet will always automatically check for spam entries.
Using the File Upload Capability
The file upload capability within Formidable allows you to permit file attachments with your users' form submissions. This capability should be used sparingly, and is recommended to be used only behind a University login. If you must use this capability, please take the following precautions to protect your form. Forms that enable file upload without taking security measures to protect against hacker abuse may be at risk of being removed from UMC's servers.
Place your form behind a University login
As mentioned, first and foremost, if you can place your form behind a University of Utah login then you are fully protecting your form as only University students, faculty and staff are able to access the form, preventing abuse of the feature.
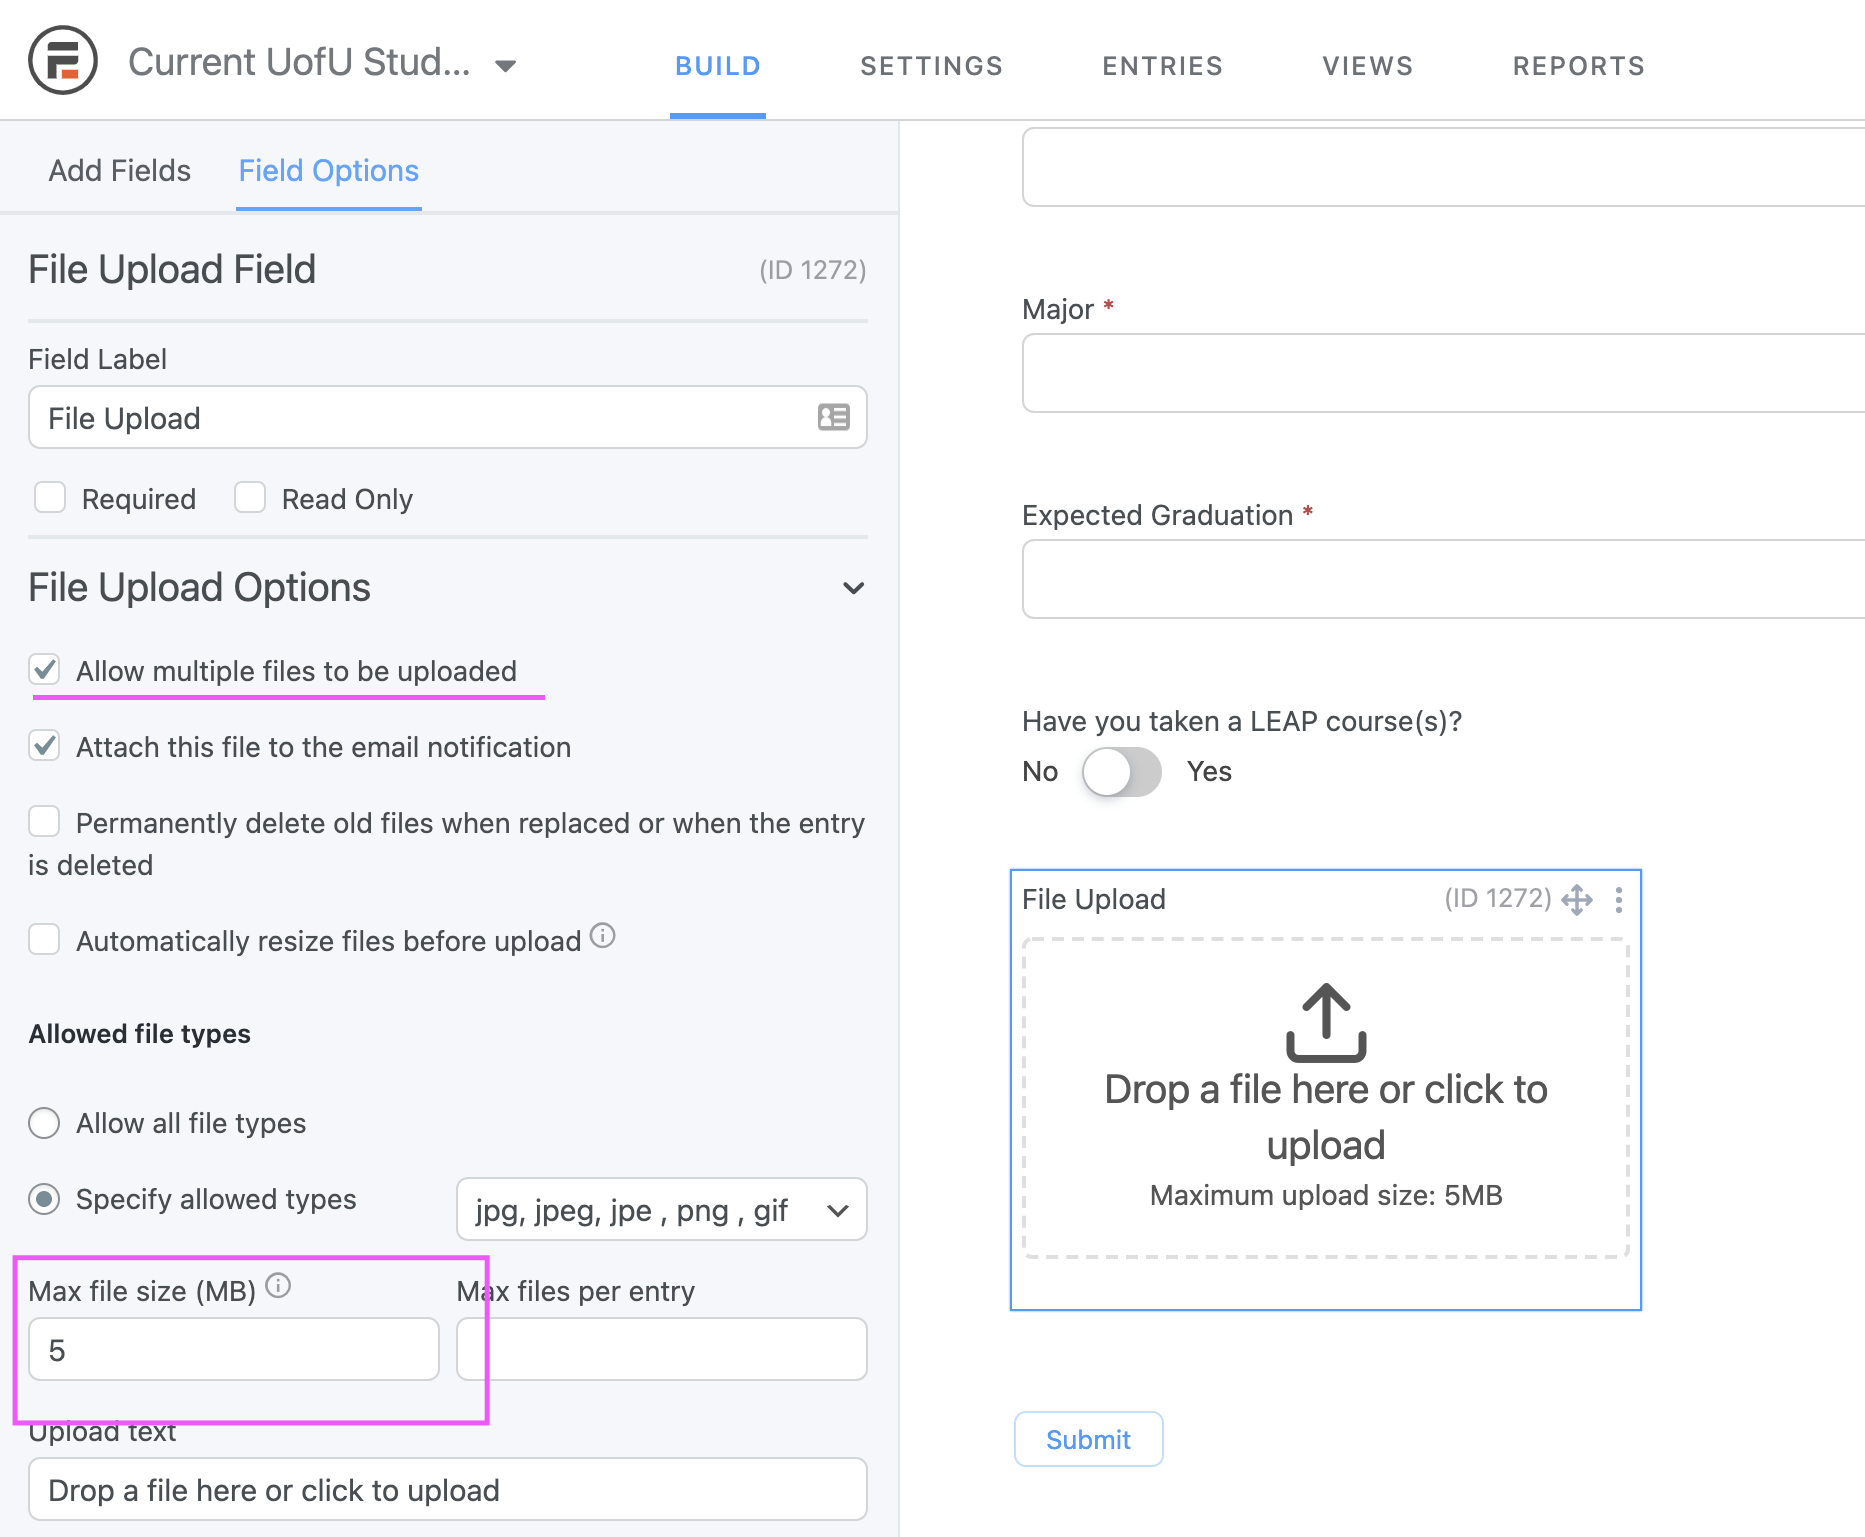
Limit number of attachments and file size
By limiting the number of attachments to a single file, and limiting the file size to 1 or 2 MB will put effective countermeasures in place to protect your form. The forms with a file upload capability enabled with multiple file attachments, as well as no limit on file size is a huge target for abuse. Limiting the file types allowed for upload will further protect your form.
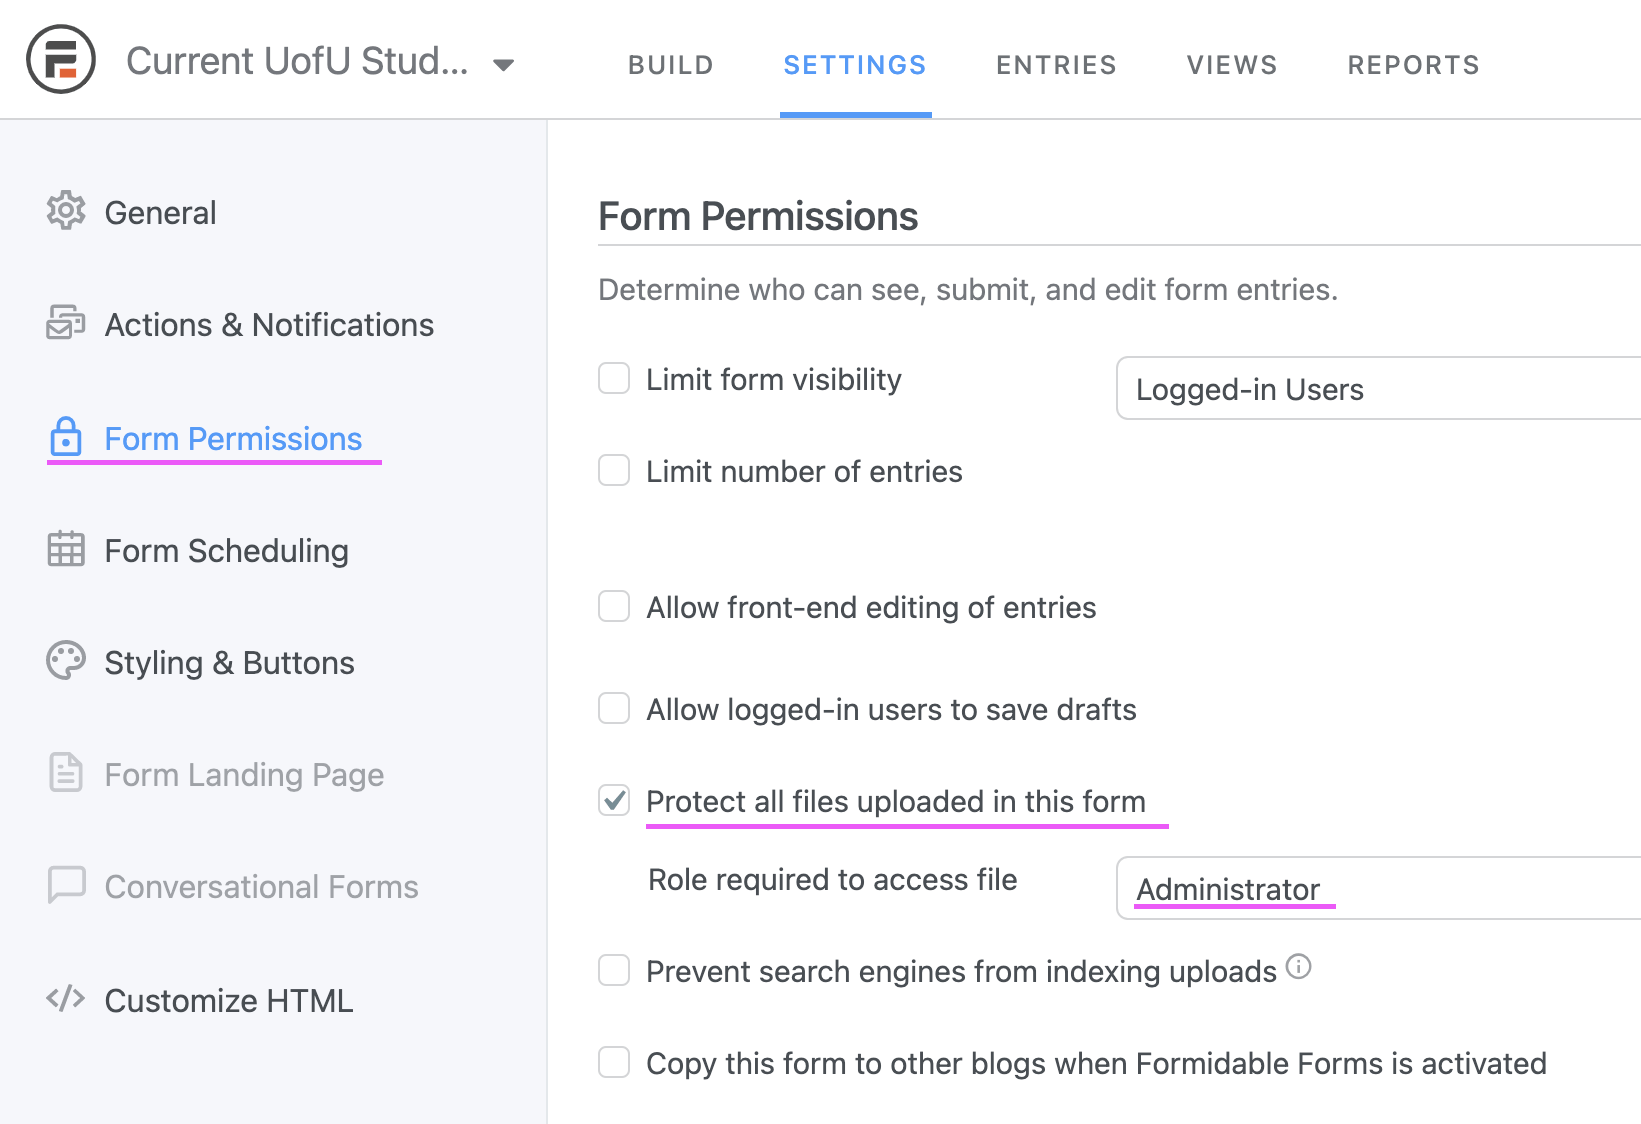
Protect the file uploads from public view
This may be the most important step you can take to secure your file uploads. Within the Form Security tab of your form, select the option to "protect all files uploaded in this form," and then be sure to select the checkbox that only allows administrators of the site to see the files. This is a critical step that must be taken to secure your Formidable form with file upload capability. Please note that this will require that you are logged in to your site in order to see the file attachments submitted along with the form.